What is OAuth ?
OAuth (Open Authorization) is an open standard authorization framework for token-based authorization on the internet. It enables an end user’s account information to be used by third-party services, such as Facebook and Google, without exposing the user’s account credentials to the third party.
Google OAuth Review Process
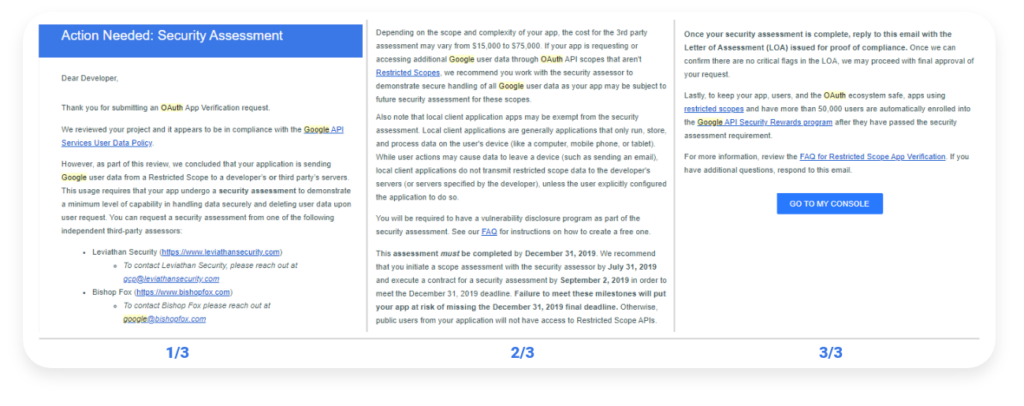
You are likely to receive an email as depicted here if you are an API developer.
The process can be broadly divided into two phases:
1. The OAuth review process
2. The security assessment
If your app accesses Gmail’s restricted scopes, you have to go through both these phases. More details here
1. The OAuth review process
It starts with initiating the review process on your Google Developer Console. You will have to go through a questionnaire which is mostly about helping Google understand the usage of the restricted scopes in your app. You only have to do this for the production version of the app. Lower environments can be marked as “internal” and they need not go through this process.
After you initiate the review, Google’s security team will reach out to you requesting a YouTube video to demonstrate the usage of restricted scopes in your app. Once you share the video, Google will either respond with an approval or a feedback email requesting more information/changes. We had some feedback from Google and we had to share a couple of videos before we got an approval from Google.
Listed below are a few pointers which might help you to reduce feedback from Google.
Google usually takes a long time to respond in this regard. Despite multiple follow ups we had to wait for a month or two to get response for some of these emails – Possibly because they had a lot of requests from app developers during that time.
Also, in general we felt there was some disconnect in their responses as it looked like every response from our end was reviewed by a different person at Google – we received an email stating that we have missed the deadline for initiating the security assessment weeks after we had initiated the process. However, Google did acknowledge the mistake on their end after we responded with the SOW that was already executed.
- Follow the design guidelines given by Google for styling the sign in button https://developers.google.com/identity/branding-guidelines#top_of_page
- Have a web page for your app which people can access externally, without having to sign in.
- Ensure that users have access to your Privacy policy page from your home page. A link to this should be given on sign in and users should only be allowed to proceed on accepting the privacy policy.
- While recording the video, go through the “privacy policy” on sign in and demonstrate that users need to accept it before proceeding.
- Your policy should explicitly quote the use of all restricted scopes.
- The policy should also mention how and why the restricted scopes are being used. Who has access to this data and where is it stored? Can it be viewed by your support staff or it’s just used by the app and humans cannot access it.
- While recording the video try to capture as much details as possible demonstrate the usage of Google’s restricted scope within your app.
- Code walkthrough wherever necessary Ex. Fetching OAuth token and its use
- Demonstrate the storage of sensitive data and usage of encryption

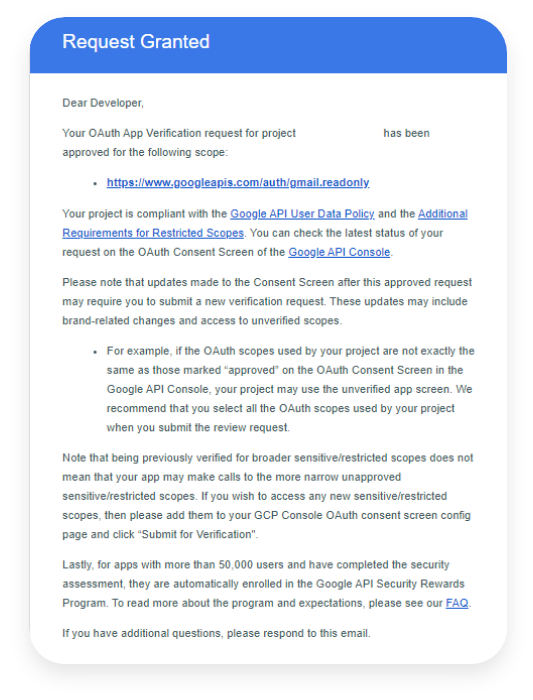
If Google is satisfied with all the details about your app and is convinced that your project is compliant with their policies, you will get an approval mail. You will also be informed if your app has to undergo a security assessment as depicted.
2. Security Assessment
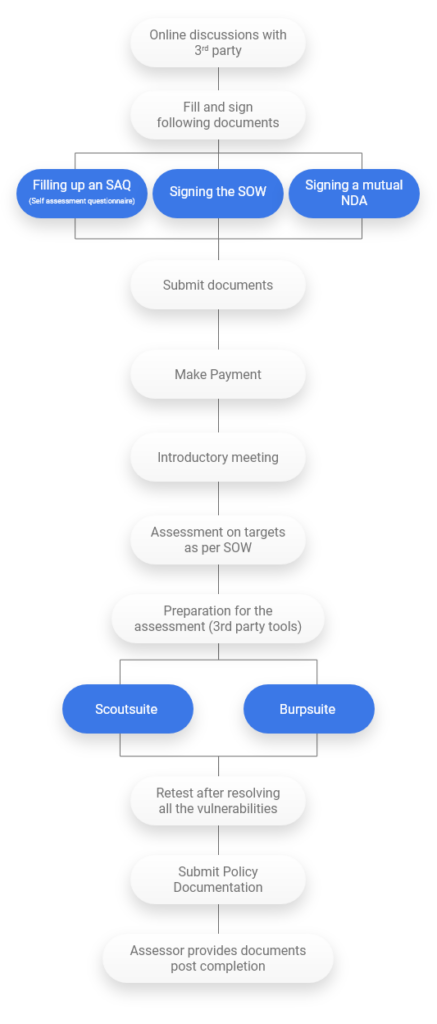
The security assessment phase relatively involved more live discussions and meetings with the assessors and therefore the overall process is quicker. You have a dedicated team assigned to help you. Google gave us the contacts of 2 third-party security assessors.We reached out to both of them and felt that ‘Leviathan’ was better in terms of communication. They shared more information about the overall process and we were more comfortable going ahead with them.We had to fill in and sign a few documents before we got started, which involved
- Filling up an SAQ(Self assessment questionnaire) – to understand about the app and the infrastructure.
- Signing the SOW
- Signing a mutual NDA
After which we made the payment and got started with the process. We had an initial introduction meeting where we were introduced to their team and our assessment process was scheduled. To give you a rough idea, our schedule was about 2 months after we had the initial discussions.As per the SOW, the assessment would include the following targets. These would possibly differ based on individual applications and the usage of the restricted scopes. For reference, our’s was an iOS app.
- Website
- RESTful APIs
- Mobile Application (iOS)
- External Facing Network
- Developer Infrastructure
- Policy & Procedure Documentation
The assessor would retest after we complete resolving all the vulnerabilities. The first retest is included in the SOW and additional retests are chargeable.The timeline we had before Google’s deadline was pretty tight and we wanted to understand from the assessor if we can do anything to increase our chances of getting it right on the first pass. The assessors were kind enough to share details about some of the tools they use for the penetration testing so that we could execute them ahead to understand where we stand and resolve as much as possible before the actual schedule.
Preparation for the assessment
As part of preparation for the assessment, you can use these tools which help you identify the vulnerabilities with your application and infrastructure. Also, ensuring that you have some basic policy documentation will save you some time.
Scoutsuite – It’s an open source multi-cloud security-auditing tool. You can execute this on your infrastructure. It will generate a report listing out all the vulnerabilities. Resolving as many as you can before the assessment would surely help.
Burpsuite – Burpsuite is not open source but you can either buy it or use the trial version. It’s a vulnerability scanner which scans all the API endpoints for security vulnerabilities. Executing Burpsuite and taking care of vulnerabilities marked as High or more will help significantly before going through the assessment. It’s recommended to run Burpsuite on your lower environments and NOT on production because Burpsuite tests every endpoint by calling it more than a thousand times. You will end up creating a lot of junk data on whichever environment you run Burpsuite on.
Policy Documentation – We were asked to share a whole set of documents before the assessment. We already had most of these documentations in place so it was not a problem for us. But, if you don’t have any documentation for your project, it would save some time to have some basic documentation for your project as a preparation. I have listed out a few here:
- Software Development Guidelines
- Network diagrams
- Information security policy
- Risk assessment policy
- Incident response plan
We reached out to both of them and felt that ‘Leviathan’ was better in terms of communication. They shared more information about the overall process and we were more comfortable going ahead with them.
We had to fill in and sign a few documents before we got started, which involved
- Filling up an SAQ(Self assessment questionnaire) – to understand about the app and the infrastructure.
- Signing the SOW
- Signing a mutual NDA
After which we made the payment and got started with the process. We had an initial introduction meeting where we were introduced to their team and our assessment process was scheduled. To give you a rough idea, our schedule was about 2 months after we had the initial discussions.
As per the SOW, the assessment would include the following targets. These would possibly differ based on individual applications and the usage of the restricted scopes. For reference, our’s was an iOS app.
- Website
- RESTful APIs
- Mobile Application (iOS)
- External Facing Network
- Developer Infrastructure
- Policy & Procedure Documentation
The assessor would retest after we complete resolving all the vulnerabilities. The first retest is included in the SOW and additional retests are chargeable.
The timeline we had before Google’s deadline was pretty tight and we wanted to understand from the assessor if we can do anything to increase our chances of getting it right on the first pass. The assessors were kind enough to share details about some of the tools they use for the penetration testing so that we could execute them ahead to understand where we stand and resolve as much as possible before the actual schedule.


Actual penetration testing from the assessor
The assessor initiated the process as per the schedule. The first thing they did was create a slack channel for communication with our team and theirs. We had to share with them the AppStore links, website details and necessary credentials for our infrastructure. They also shared a sharepoint folder for sharing all the documentation and reports. We started uploading all the necessary documents and in parallel they started the penetration testing and reviewing our infrastructure. Again, do NOT share the production environment for penetration testing as it will create a lot of junk data and may delete existing entities.
After two days of testing they shared an intermediate report and we started addressing the vulnerabilities. After about a week we got the final report of the vulnerabilities. We addressed all the vulnerabilities and shared the final report. Here are a few remediations that were suggested for us:
- We had to add Contact details for users in our web page to report vulnerabilities
- Enable Multi Factor authentication on our AWS logins
- Requested for logs around Google OAuth token usage
- Encryption on RDS, EBS volumes
- Documentation demonstrating KMS(Key management system) usage.
Upon completion of the assessment, the assessor will provide a document containing the following components:
- Executive summary, including a high-level summary of the analysis and findings and prioritized recommendations for remediation
- A brief description of assessment methodologies.
- A detailed discussion of analysis results, including relevant findings, risk levels, and recommended corrective action.
- Appendices with relevant raw data, output, and reports from the analysis tools used during the engagement.
That was the end. Couple of days after the approval from the assessor, we got an approval email from Google.


